I wanted a solar wax melter for a long time because it seemed like such a neat idea. I saved DIY plans whenever I came across them but never got around to making one. Soon after I installed my bees, I started accumulating wax from burr comb scrapings and culled frames. After several years, I realized I had too much wax cluttering my workshop. And even worse, I discovered that wax moths had arrived to get the recycling job done, despite my procrastination. That did it! I gave up on my fantasy of building a homemade wax melter and bought a Lyson solar wax melter instead. After seasons of use, it’s become indispensable. Learn more about beeswax, how handy a solar wax melter is, and how to choose or craft a DIY solar wax melter for your own use.
Beeswax offers many benefits
Beeswax is a precious thing. Every pound of wax costs the bees about six to eight pounds of honey used as energy to fuel the bees’ metabolisms to make wax and draw out the combs. And in turn, that amount of honey represents more than a hundred thousand miles of foraging flights to gather nectar and untold billions of wing beats to evaporate down into honey.
Beekeepers know that drawn comb is gold, but what about the inconvenient bits we’re constantly scraping off the frames and between the boxes? Many beekeepers just toss that on the ground. And even though I carefully collected and stored my excess wax in containers, I wasn’t doing much better by just letting it pile up for the mice and moths.
What do you do with excess beeswax?
So why process your beeswax? There are plenty of things you can do with wax, scraps included. After melting your beeswax, put it to use with one of these ideas:
- Use it as a lubricant to keep hinges from squeaking — it lasts longer than oil!
- Craft your own beeswax candles by pouring your melted wax into candle molds — there are hundreds of shapes and styles to choose from.
- Whip up some homemade natural skincare products, including soap, lotion, and lip balm, to enjoy for yourself or sell at your product table.
- Condition wooden cutting boards, bowls, and utensils with a mineral oil and beeswax mixture — simply apply it to the board with a clean cloth, rub it in, and buff away any excess.
- Apply a thick coat of melted beeswax to your plastic foundations to encourage the bees to build out comb.
- Lead a group activity making beeswax products as part of an educational series at a library, school, or summer camp.
- Not going to use your wax? Sell it, trade it, or see if someone from your beekeeping association can use it.
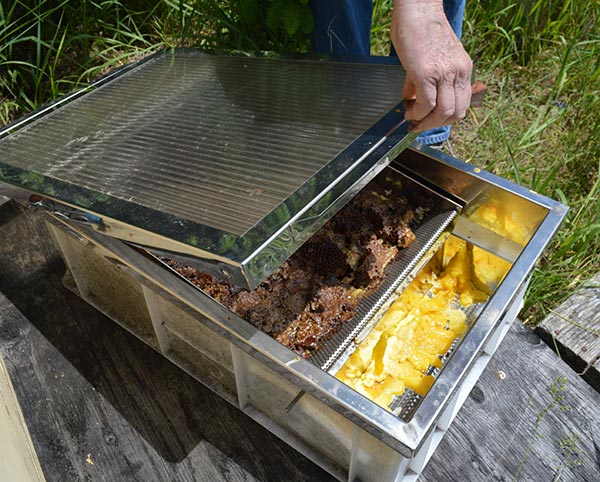
How does a solar melter work?
A solar wax melter is a box with a filter and collection tray, covered with a glass lid. When the sun shines through the glass, it heats the interior of the box until the beeswax reaches its melting point at 145 degrees.
Safety note: Never melt beeswax over an open flame or expose it directly to a heat source — it may scorch or ignite.
How to process beeswax in a solar melter
When I brought my melter home and set it up in my yard, I didn’t know what to expect, so I dumped in some wax from the day’s bee work and left it. The next day I was delighted to find a neat blob of lovely clean wax in the collection pan and nothing but gunk (slumgum) left on the tray above. Well, it’s spring, I told myself, so of course the wax looks nice.
Next, I tried melting some very dark brood combs. This produced clean wax, too, and left behind amazing black “skeletons” of the pupal cocoons on the tray. Pretty soon, I was almost as interested in seeing the wax melter’s daily product as I was to check on my bees.
Now when I work my bees, I simply collect all the bits of comb and slip them into the melter on my way out of the yard. When I cull a comb, I scrape the wax off the foundation and put the wax in the melter. Now and then, on a warm day, I scrape the slumgum out, but other than that, there is no maintenance. Except, of course, for periodically swapping out a filled tray of clean wax.
The wax is clean enough that I melt it and use it, as is, for adding extra wax to my plastic foundation. Wondering how to melt beeswax for candles or skincare products? The process is the same — but, if I was using the beeswax for producing lip balm or candles, I would melt it again and do a second filtration for the cleanest final result.
Tips for using a solar wax melter
A solar melter is an easy tool for processing wax, but these quick tips and tricks will improve the process and produce even better results.
- The melting process itself separates the debris from the wax so cleaning isn’t a requirement, but a quick rinse is beneficial: Simply rinse the cappings a couple of times in cool water before adding to the melter.
- A wax melter will work best when used on a level surface in a sunny location.
- Beeswax melts better when the temperature is above 75 degrees, but you may see progress on cooler days when the sun is bright.
- Solar melting is not a quick process, but if you check every few hours, you’ll soon see progress. Large or extra dirty batches of wax may take multiple days to fully melt.
- Keep the screen, catch basin, and metal pan clean for best results.
Find DIY solar melter plans
If you’d like to make yourself a solar melter, there are plans aplenty on the Internet. I’ve always admired the Michigan Beekeeper’s Association wax melter plans. I am sure it would be a very satisfying project to undertake. But if you, like me, are perpetually hoping to do more things than time allows, then consider buying a melter and putting it in service immediately.
If you happen to come and visit Betterbee this summer, you can see our solar wax melter working; look for it behind the Bargain Barn. Explore more beekeeping tips and beeswax processing tricks in our Resource Guide.