 Queen marking tools
With so much riding on whether a colony has a queen, anything that makes it easier to confirm is a good thing — and that’s where marking queen bees comes in handy. Bee suppliers often charge a fee for marking a queen, which can be the best few bucks you spend on bees in your first year. But, if you’d prefer to take queen-marking into your own hands, this guide provides tips, tricks, and advice for how to mark your queen bees.
Why mark your queen bees?
A colony with a laying queen has her work product on display, right on the frames, in the form of eggs, larvae, and capped brood. Even if you can’t see the tiny eggs, the larvae and capped brood are unmistakable proof that there was a queen in the hive quite recently.
Even with the evidence of brood to prove you have a queen, sometimes you really want, or need, to locate her among the throngs of bees. Having a colorful dot on the back of her thorax can make it easier to locate and identify your queen.
The other reason to have a marked queen is that you know that a particular queen present in the hive is exactly the same one as before — and not her daughter. Eventually, queens get replaced due to natural events like swarming and supersedure, leaving you again hunting for one brown insect among tens of thousands of them. Developing your ability to spot unmarked queens is a useful skill to work on —but having a marked queen makes the job much simpler.
A step-by-step guide to marking a queen
Marking queens goes beyond a basic beekeeping skill set. However, with practice, simple tools, and a little beekeeping moxie, most beekeepers can learn to mark their own queens. Follow these steps and tips for learning to mark queen bees, from practice to the real deal.
Quick tip: Not interested in marking your own queens? No problem: We, and most bee suppliers, sell and ship marked queens.
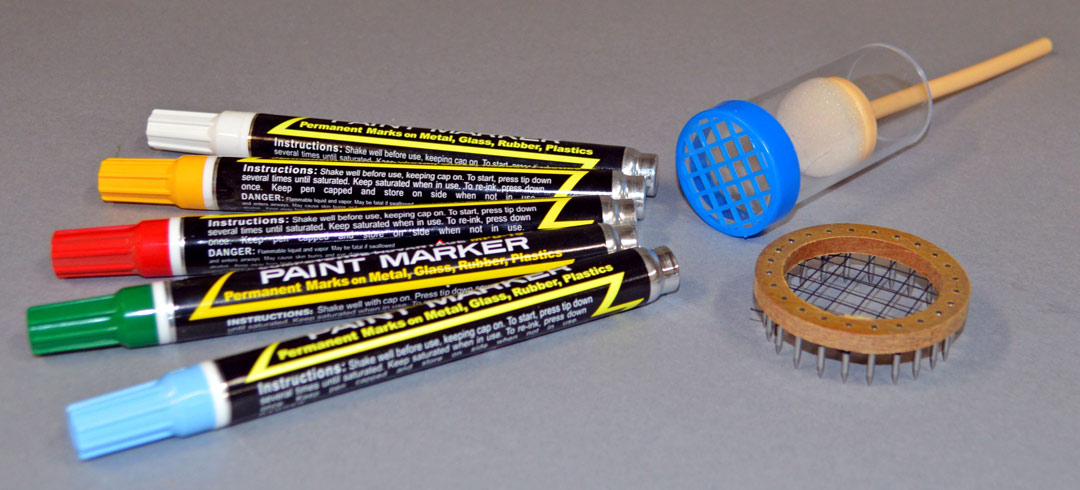
What kind of tools are needed to mark queens?
While some experienced beekeepers simply hold the queen in their fingertips while marking her, we recommend using tools specifically designed for the job — especially while you’re gaining experience and confidence.
There are several devices used to hold a queen safely while doing the marking, but the round push-in queen marking cage is the easiest to learn to use. First, gather your queen cage and your paint-filled marking pen.
Bee-marking note: These instructions are for using paint pens to mark your queen. If you are using a bee marking queen numbering kit, glue is required to adhere the colored decals, so the steps for marking your queen will be different than outlined here.
What color should you use to mark your queen?
Did you know there’s a color code for marking queen bees? While you can mark your queens any color you want, there is an established convention for annual colors for marking bees.
This is the “official” schedule of queen marking colors:
- WHITE: Years ending in #1 or #6
- YELLOW: Years ending with #2 or #7
- RED: Years ending with #3 or #8
- GREEN: Years ending with #4 or #9
- BLUE: Years ending with #5 or #0
If you prefer a more whimsical way of remembering the changes from year to year, here’s a mnemonic: “What, You Raise Green Bees?” The first letter of each word tells you what the color order is: W(hite), Y(ellow), R(ed), G(reen), B(lue).
Quick tip: It’s a good idea to get one color for marking the queen, and another for practicing on other bees beforehand. Often, beekeepers choose the next year’s designated color as all the marked “practice bees” will have died by the time you want to mark next year’s queens.
Practice your queen-marking skills first!
Paint pens can be tricky to manage at first: The paint can come out in a stingy amount or gush out in a blob, so practice is in your best interest. Before marking any bees, try these steps on paper, wood, or another surface:
- Begin by shaking the capped pen vigorously.
- Then uncap it and press the tip (plunger) repeatedly against a hard surface until the paint flows down to the tip.
- Practice making neat little dots — about the size of a sesame seed — on a spare surface. You want just enough paint that makes a nice mark without having to keep filling it in. Make a controlled little daub, and then leave it at that.
- When you’re done, close up the pen and set it on a horizontal surface — always store paint pens horizontally to keep the ink from settling and drying out!
Then, when you’ve got it right, give it a try on bees — but hold off on that queen for a bit longer. Drones are big and easy to spot, but despite their lumbering size, they have a wide field of vision and can be surprisingly nimble and tricky to trap within the cage. They are worthy targets of your first practice efforts!
Practice marking drones
The key to a successful mark is to get the little dot of paint squarely in the center of the bee’s thorax. You don’t want paint on the wings or head, or dribbling downward — but you don’t want such a tiny speck that it’s too hard to see, either.
Eventually, you’ll be marking your queen, but initially just start with a drone to practice. Once you’ve located your intended target — now, the drone, but later, the queen — pull out the frame and lay it down gently on top of the open box. Having the frame supported on the box makes things easier, although some workers just lean the frame against the box or their spare arm.
Leave your paint pen open, easily accessible, and flat, while you prepare to mark your bees.
Quick tip: Although marking can be done with just one hand, it’s easier if you have two hands free.
1) Capture the bee within the marking circle
Remember the needles around the push-in cage are sharp — sharp enough to do serious damage if you stick one into a bee. Operators usually hover the cage over the bee looking for just the right moment to set it down over it. Select an area where the pins will not pierce down through cappings into brood, and put it down gently at first.
Quick tip: Neither queens nor drones can escape the cage, though workers can go out between the pins.
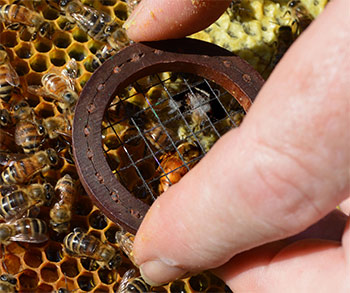 Set the ring down over the bee
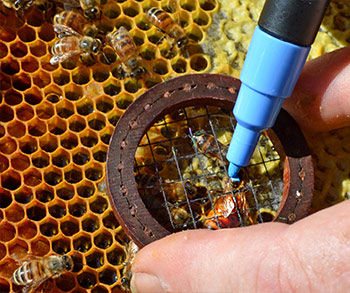 Use a light touch to make the mark on the thorax
2) Immobilize the bee by pressing down on the circle
Downward pressure on the outer ring of the cage traps the bee between the crossed threads and the comb. As you watch for the right opportunity to press down, wait until the center of the bee’s thorax is solidly within an open space between the crossed threads. You want to press down just enough to stop the bee from moving or wiggling out of position, but not so much that you squash it. This takes practice on live bees!
3) Make your mark
Give the pen one last touch against a solid surface to remove any accumulated drips (the edge of a box is a handy surface) and then gently mark the bee’s back. If it seems too small, you can add a little more, but more often it’s better to go with what you’ve got the first time. The greater risk in trying to add to the mark is winding up with too much. With a long-living queen, you will have other chances to touch it up.
4) Immediately lift the needle circle up and release the bee
Don’t leave it trapped under the circle as it may start to struggle harder and smear the wet paint onto other parts of its body. After release, the bee will most likely be unfazed by the event, even if your own hands are trembling the first few times. Drones may fly away, but a queen will likely just walk around and reassemble her court of attendants.
Carefully set the frame back into the hive, or place it temporarily into a nuc box if you’ve got more work to do. Be sure to cap the pen after the bee has been released to keep the pen in good condition for your next effort.
5) Practice, practice, practice on live drones
It can take some time to develop a sure hand at applying just the right amount of paint in a single pass. Once you can capture and immobilize the drone quickly and manage the logistics of getting the pen on the right spot, with the right pressure and volume, you’re ready to try a queen.
Now, you’re finally ready to mark a queen
After you’re comfortable marking drones, you can try marking your queen. Keep in mind that queens don’t have the same body thickness as drones, so you’ll have to push the circle a bit farther into the comb to hold her securely — but she shouldn’t be pressed down any harder than for drones. She will have a more dedicated retinue than a drone and they may react to any alarm pheromones she gives off.
Occasionally there is just too much of a scrum over the circle to get a good enough view to try to immobilize her safely. You can pick off the surface bees, but sometimes it’s a losing battle. If that happens, just give it up and try again another time.
Learning to mark your own queens is a confidence-building skill as well as a time-saving convenience for you when you really need to see her, and not just her work. It’s a very worthwhile goal, even if you just get as far as practicing on drones this summer. For more tips on queen bees and beekeeping, explore our Beekeeper’s Guide.
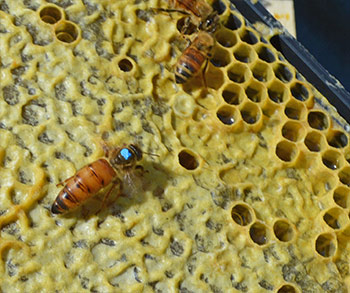 Queen immediately after being marked