Controlling Varroa destructor mites is one of the best things we can do to help a colony thrive during the active season, and low mite levels also increase the chances of that coming through winter healthy and ready for spring. Most beekeepers (like us!) rely on chemical miticides to manage their mite populations, but there is also an interesting non-chemical option to control mites that involves confining the queen to a cage.
DISCLAIMER: The techniques described in this article are NOT proven methods of varroa control that we recommend to the average beekeeper. We are currently testing different methods of queen caging for mite control, but we don't have the answers yet. This article lays out the theory and the scheduling for caging a queen and then treating the colony during the resulting brood break, but we do not yet recommend this method for the average beekeeper. If the ideas appeal to you, and if you are confident in your ability to troubleshoot and adapt to problems or surprises, you can certainly attempt this with one of your own colonies. If you do give it a try, we'd be eager to hear how it works for you and your bees.
Queen caging to limit varroa population growth
If the laying queen of a colony is caught and confined to a small queen cage, she will be unable to lay eggs until she is released. If she is caged for a long time, varroa mites will have no bee brood on which to reproduce, because a large “brood gap” or “brood break” will have been created. Brood rearing can also be interrupted by splitting colonies, allowing them to swarm, or allowing them to become “honeybound” with nectar packed into their brood nest. All of these circumstances lead to a break in the availability of brood, which can leave some mites scrambling for a place to reproduce before the bees can groom them off. Caging the queen just simulates these more natural circumstances to produce the same brood break at the time of the beekeeper's choosing.
Of the legal miticides available in most of the U.S., three of them can be used while honey supers are on the hives. Formic acid (in the form of Formic Pro) and oxalic acid (in the form of Api-Bioxal) are available, but only formic acid penetrates the brood caps and kills mites as they reproduce in the cells. However, since formic acid can't be used in ambient temperatures above 85°F, there is great demand for ways to treat mites, with supers on, in warm weather, without most of the mites being protected from your treatment.
Caging your queen to create a brood break, waiting the appropriate amount of time until the colony has little to no remaining capped brood, and then treating with a miticide that kills mites on the bees is a great example of using synergy to hit mites with a one-two punch. You can get even more synergy if you combine queen caging, brood removal, and the treatment of a colony when they are broodless into a one-two-three punch.
Brood development and varroa mite trapping timing
Let's review the basic math of bee life, looking at the four stages of development. A honey bee egg is an egg for 3 days. Worker larvae (also known as open brood) get fed for about 6 days, while drone larvae get fed for 7 ½ days. At that point, the larvae are capped over and quietly metamorphose into adult bees. While we call this stage “capped brood,” scientists call it the “pupal stage.” Workers usually remain capped for about 12 days, while drones are capped for about 14 days, with some slight variation due to the genetics of the particular colony.
Varroa mites want to skitter into cells right before the cells get capped. While they reproduce under the caps they're content, but they're also trapped.
Trapping mites with drone brood is well-known as an IPM technique that can be useful while drones are actively being raised in the colony. Usually for three cycles of drone brood each season, you can remove full frames of capped drone brood and freeze it to kill all the mites in those cells. Unless you're a queen breeder, you usually won't miss those drones and won't mind sacrificing a few thousand males to shrink your mite load.
Let's take the mite trapping concept a step further. Can we restrict the queen so that for a period of time, there's only one frame with any tempting open brood for all the mites in the hive to try and crawl into? The answer is yes.
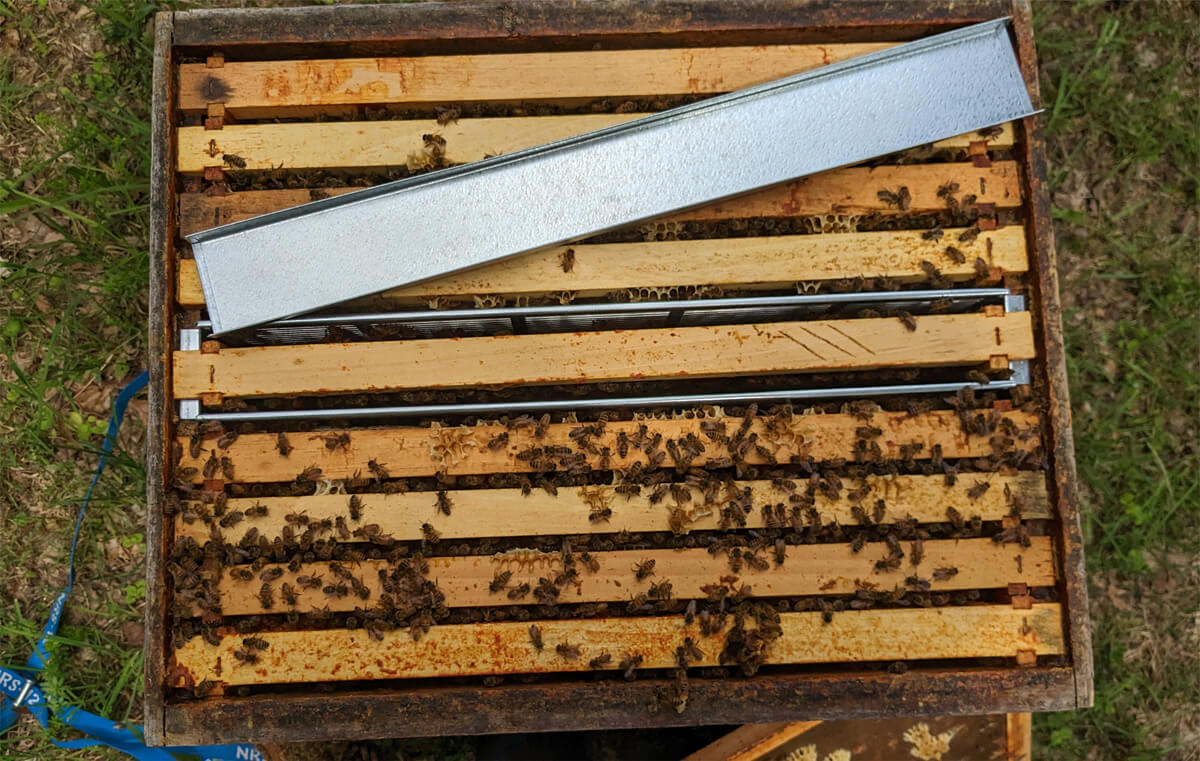
Using a Frame Isolation Cage to control varroa
Using a frame isolation cage, made of metal queen excluder material and sized to hold one frame (medium or deep), the queen is confined, but has room to keep laying eggs. This is appealing to beekeepers who want to try caging their queens, but are hesitant about completely stopping her from laying for long stretches of time. By restricting the queen to one frame where she continues to lay eggs, you limit the brood in the colony while still allowing her to continue laying. This will produce a continuous (though reduced) supply of brood pheromones, and will allow her to keep her egg-laying machinery in working order. A laying queen has her full complement of pheromones, so confining her like this may give better results than just keeping her in a tiny queen cage in the hive.
To install the frame isolation cage, you'll need to remove two frames from the hive. One frame can be inserted into the cage, and the other frame must be stored elsewhere to make room for the bulk of the cage. Two frames can also be removed from the hive and a brand new empty frame can be put into the cage, if desired.
Step-by-step instructions on using a Frame Isolation Cage to fight varroa mites
Reminder: The method below is still being tested. Betterbee cannot guarantee your outcomes if you try this technique, and we don't recommend it to beginning beekeepers who are just getting started.
Step 1: Put an empty frame of dark (brood) comb into the cage, then place the queen inside. She'll be joined by workers, and they will care for her and the brood she produces. This is Day 1 of your manipulation.
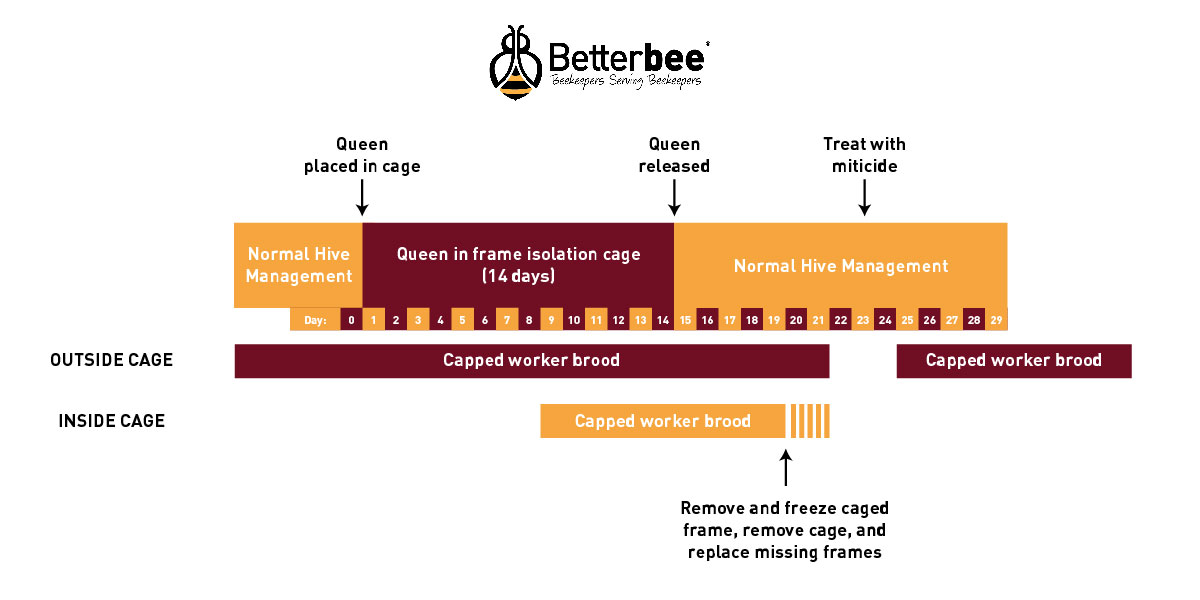
Step 2: Leave the queen in the cage for approximately two weeks (see diagrams below). We need to cage her long enough to produce a gap when all of the brood outside the cage will have emerged, but there will be no other capped brood in the colony except on the frame inside the cage.
Step 3: Remove the queen from the cage and return her to the hive, allowing her to start refilling the brood nest with eggs. Leave the frame inside the cage, where it will continue to receive care from the colony's nurse bees, but where the queen will not be able to lay any further eggs. Remember to check the colony a few days later to make sure that the bees aren't making supersedure cells throughout the hive out of concern that something has gone wrong with their queen.
Now you have a choice. You can try to trap many of the mites in the caged brood and destroy it, you can treat the colony while many of the mites are exposed, or you can do both. Doing both will give the best mite control.
Step 4A: Remove the frame of capped brood from inside the cage.
Step 4B: Treat the colony with a miticide. You can use vaporized or dribbled oxalic acid or a single pad of Formic Pro to kill the exposed mites. (You can even use Apilife Var or Apiguard if there are no honey supers on the hive.)
The diagram below shows a simple timeline for caging the queen for 14 days, removing the caged frame on Day 19 or 20 of the manipulation, and treating the colony with miticide on Day 23. This simple method may give acceptable mite control, at the expense of some bee population growth.
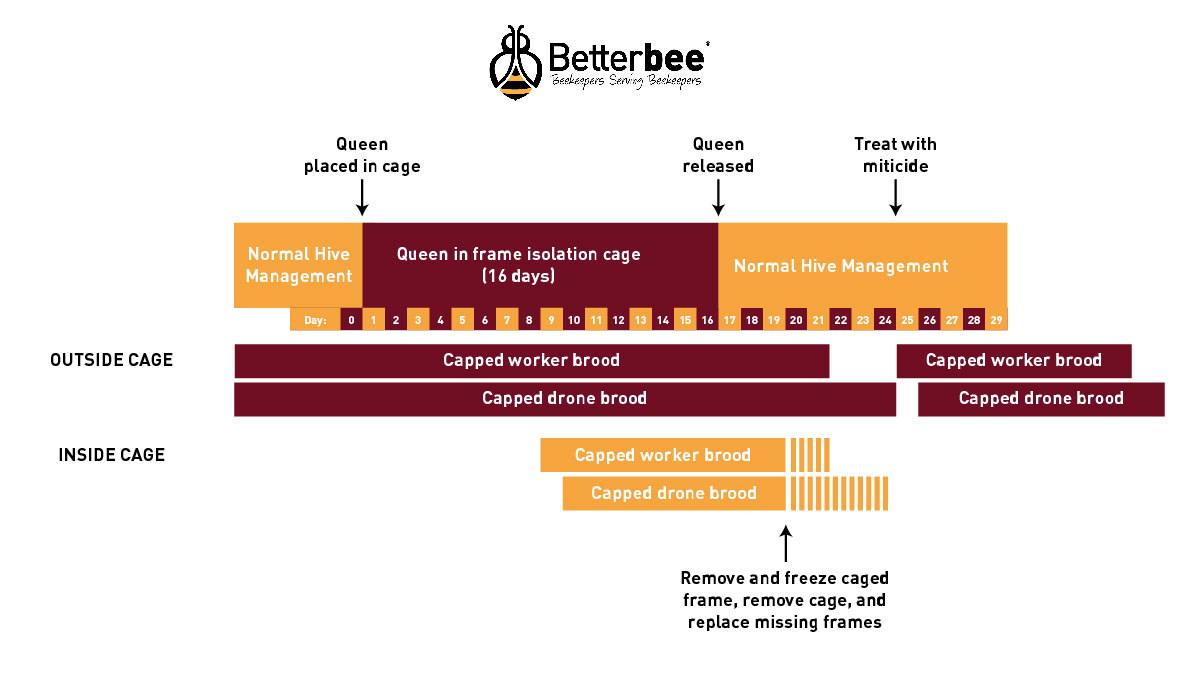
However, before you try the method shown above, remember an important detail: Drone bees take longer to develop than worker bees. This means that the more drone brood you have in your colony, the more mites will be able to avoid this treatment by hiding in drone cells. If you try this method during a nectar dearth later in the season, it's possible the bees won't have many drones. However, if you want to try these manipulations in the middle of drone production, you may have better luck working from a second, more complicated diagram.
In this diagram, you will cage the queen for 16 days, remove the caged frame on day 19 or 20, and treat the colony with miticide on Day 24 or 25. (Caging the queen even longer would provide a wider gap between brood generations, but the benefit may be quite minor.)
This method provides multiple layers of mite control, and they synergize together to help reduce mite levels. Interrupting brood production in the hive slows colony growth, but also interrupts mite reproduction. Removing the “trap frame” of capped brood from the isolation cage will remove mites that rushed into only open brood that were available. Treating the colony when there is no capped brood means that no mites will be protected from the treatment.
The cost of sacrificing the brood on the cage frame is certainly worth considering. 7000 worker cells fit on a deep frame, so up to 7000 workers may be lost. However, killing the mites trapped inside those cells may make the sacrifice worth it. The growth of the bee population will be stalled by this entire procedure, so you should only attempt this method when you don't need your colony's population to grow for a while (e.g. at the beginning of a long nectar dearth in your area.)
Tweaks and modifications
- You can install a completely full frame of honey into the frame isolation cage. This will allow the queen to wander freely, but she won't be able to lay eggs. However, then she won't be laying eggs and producing brood pheromones continuously.
- You can install the queen onto a frame that contains all (or just a lot of) drone comb. If she produces a batch of drones, they will be extra attractive to the mites looking to reproduce. Is it possible the smell of a queen only laying drone eggs for two weeks might make the colony think she's running out of stored sperm? Perhaps. When she's released and starts laying worker eggs throughout the hive, you'll need to make sure the bees don't try to supersede her in the next few days.
Pitfalls and troubleshooting
- Reduced brood pheromone may cause the colony to worry that the queen is failing, so they may attempt to make supersedure cells to replace her. You must check the brood inside and outside the cage a few days after the queen is caged, as well as the first brood that the queen lays after she is released from the cage, and destroy any queen cells that you find. Any colony with a caged or isolated queen should be thoroughly checked for queen cells a few days after she is caged to prevent a queen deathmatch when she is released.
- This method will interrupt brood production in your colony - if you attempt it in early spring, you may severely limit your colony's growth for the year. Trying it during a long summer dearth may reduce brood rearing at a time that the colony can handle the decrease in new bees for a while. No matter when you try it, you will be sacrificing brood production to generate this varroa-control opportunity.
- Make sure to remove the cage prior to applying your treatments, as some treatments (especially the organic acid treatments) may corrode the metal of the isolation cage.
- If the frame isolation cage is installed during a strong honey flow, the bees may build some burr comb on the surface of the cage. This is fine, but will require extra care when inserting or removing the frame.
- If you don't treat and only try to trap mites in the caged frame, keep in mind that not every mite was ready to reproduce when the last cells in the frame were capped, so you shouldn't expect to capture every mite in the colony using this procedure.
- Remember that this method is not yet proven, so you could see many unexpected results or problems if you attempt it. We think the fun of beekeeping is learning how to be better beekeepers, but trial and error learning does have some costs that a cutting edge experimental beekeeper needs to be prepared for.