A Nervous New-Bee's Guide to a Successful Package Installation
When you've ordered your first package of bees, you may be both excited and anxious. If you've never handled bees before, it's normal to be a bit intimidated at the thought of getting the bees transferred from their shipping container to your hive.
Like many things in beekeeping, there is more than one way to install a package. The method described below gets the job done in a way that's easy for beginners without a lot of experience (yet!) in handling bees. The bees will do most of the work of getting themselves out of the container and onto the frames inside. All you must do is get the process started.
Prepare your hive setup and feeder before you bring your bees home
Get your hive ready well before the expected arrival of your bees: Hive stand set up, boxes painted and frames assembled. Set up the hive with a base, top, and only one deep box (or two mediums) to receive the bees. Slide the wood entrance reducer into the entrance, leaving only the small opening available. Cover the notch in the rim of the inner cover with duct tape for the time being. Make sure you have a few large rubber bands and a spray bottle with a little syrup in it.
It may seem a bit absurd to be feeding honey bees sugar syrup, but it's the surest way to get them off to a good start. It requires an enormous amount of calories to fuel the critical wax-making that a package must do. There is great urgency to get comb drawn out so that the queen may begin laying replacements for the bees in the package which have only a few weeks of life ahead of them. Feeding provides a reliable source of energy, 24/7, and in all weather. You can make your own sugar syrup or feed Pro-Sweet syrup.
Don't let last-minute jitters make you late for the pick-up time. It will be fun!
Once the bees are loaded in your car, go directly home – this isn't the day to stop for brunch or go shopping.
Tips for installing your package of bees
It's best to get the bees installed as soon as possible after you get home. Place the bee package in a quiet, sheltered place (garage, cool mud room, etc.) while preparing to install them. If the weather is very bad, it's OK to hold them indoors - for up to a day - in a cool, dark place. See package instructions for interim care.
If you plan on using an frame (division board) feeder, take out a frame and install the bee feeder against one side wall of the box, fill it with syrup. Then remove five frames from the other side of the box to make room for the package container. (If using an 8-frame box, remove fewer total frames.) You'll need at least three frames, plus the feeder and room for the package container. It may be a bit tight, at first). After the bees - and the package they came in - are installed, put one additional frame back in. This is how a box with a division board feeder will be arranged at the end of the install.
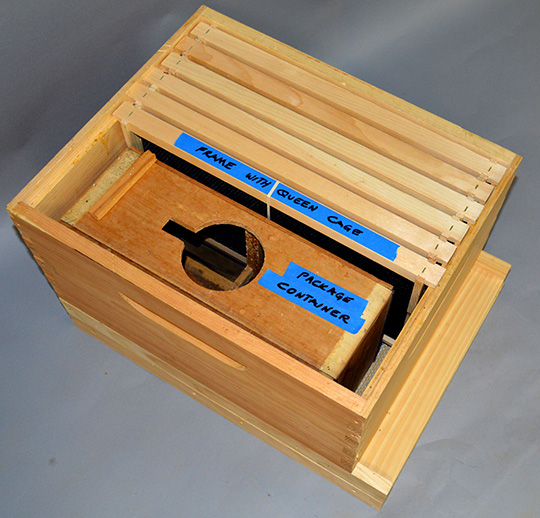
For all other installations, just remove five frames from one side to make room to set the package container down inside the hive. (Or in the case of mediums, have two medium boxes stacked up and remove five frames from each of the two boxes to provide enough height for the container.) Once the package has been set down in the hive, add the extra frame as described above. Hives without a division board (frame) feeder should be fed with apail, in-hive or top feeder. This is how the box where the bees will be living will be arranged after the installation.
With the hive prepared, carry the bees out to their new bee yard.
Lightly spritz the bees through the screen with some syrup to calm them.
Step-by-step installation instructions
First, pry off the thin wood panel on top of the container – no bees will be able to get out at this stage. But keep it handy to cover up the holes created in the next steps.
Next, remove the queen cage by pulling up on the round metal cover. Slide the panel over the resulting hole.
Examine the bees inside the cage. If the queen is marked, you may be able to spot her, but don't worry if you can't. The bees are going to let her out of the cage, when the time is right.
To get that process started, pry the metal disk off the end of the cage closest to white blob of “candy” inside the cage. Remove any cork plug that covers the candy end of the cage. But leave the cork that's on the other end in place! Use a rubber band to fasten the cage to the frame that's closest to the open space created when you removed the frames. The candy end of the cage goes up and the screen-side of the cage should face either the front or back of the hive. When you put this frame back in the box, the queen cage should be between two frames.
OK, now for your first beekeeping trick: Thump the package on the ground to knock the bees down to the bottom of the package container. Thumping is a very useful way to move a lot of bees, quickly, and with minimal fuss. Don't be too tentative; a crisp, decisive thump is best. Just make sure you never thump anything against the hive itself!
With the bees on the bottom of the container, use your hive toolto pry the syrup can up and out. Slide the panel over to cover the now-open hole.
Are you ready now? Slip the panel off, tip the package up and dump a cup or so of bees down onto the frames where the queen cage is. Then simply set the wide-open container down into the space you've made for it. With the package container in place, add in one additional frame to fill the box up. Over the next hour, or so, the remaining bees will get themselves out of the package, and on to the frames, all on their own.
All you have to do right now is close up the hive:
If using a pail or in-hive feeder, install it over the inner cover's central hole and surround it with an empty box, then place the outer cover on top of the hive.
If using a top feeder, place it directly on top of the box and fill it with half a gallon of syrup. (You'll need to remove the feeder in three days to check on the queen. A feeder with a lot of syrup is awkward to lift, so just use a modest quantity this time. With top feeders, you can easily peek in and check on the amount later, without disturbing the bees.) You do not use an inner cover while using a hive top feeder. Put the outer cover directly on the top feeder.
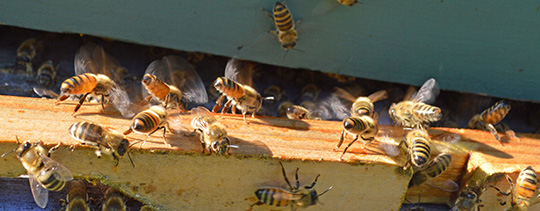
Depending on how smoothly things have gone, you may have a mini-cloud of flying bees outside, or bees walking on the ground. Either way, it's fine. The bees all want to move to where the queen is and some bees will soon begin fanning at the entrance to signal to the others to "come on home!"
NEXT STEPS: After three days, check to make sure the queen has been released from the cage. If she's not, poke a little hole in the candy to speed up her release and check again in three more days. When you make the first check, remove the empty package container and fill up the empty space with frames. Top up the internal feeder and add some more syrup to the pail or top feeders, if needed. Then leave the bees alone for a week or so. By the time you check them again, there should be very exciting changes with freshly drawn comb and the first eggs laid.
Congratulations, now you've got bees and you're on the path to becoming a beekeeper!
Check out the video below showing a second method for installing a package of bees:
The browser you are using is not supported on this site. You may experience issues with some features on the site. It is recommended that you use one of the following browsers - Chrome, Edge, Firefox, or Safari.