During warmer months, moisture and temperature are controlled by your bees, which helps ensure the best outcomes for your hives. However, in the winter, bees are less active and moisture isn't managed as closely. Staying dry is imperative for winter survival, and a quilt box is one way to help. Learn how to make and install a quilt box, and see how this simple hive addition helps improve winter survival.
What is a quilt box?
Despite its name, a quilt box isn’t meant for warmth but is instead a moisture management tool that is added to the hive during winter. A quilt box offers ventilation for moisture management, which can take some of the pressure off of the bees. When you install a quilt box, the moisture inside the hive rises to the inner cover, where it condenses then drops into the quilt box to be absorbed by wood chips.
Where does the quilt box go on a hive?
The quilt box rests on the top box of your hive—if you use a candy board, place it on top. Your outer cover is placed on top of the quilt box. You can use an inner cover and an outer cover, if you need the extra insulation.
How to make a quilt box
It’s easy to make your own quilt box. There are many variations of quilt boxes, but the design below is one we find successful in harsh upstate NY winters.
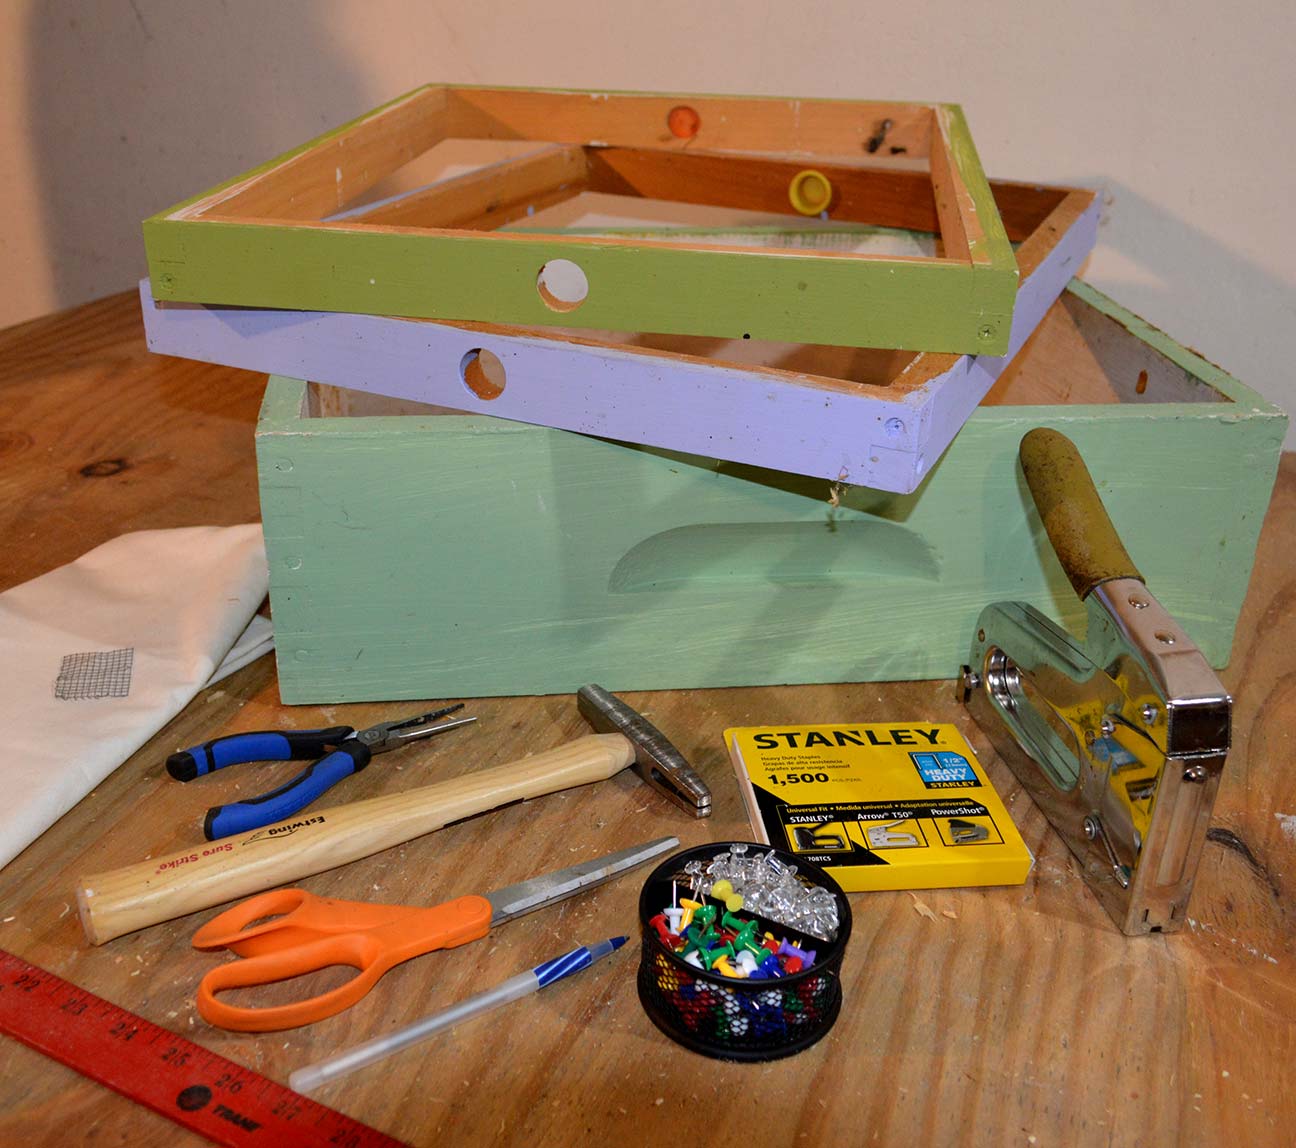
First, gather your supplies:
- Shallow depth box
- Two wooden shims
- Fabric for the floor (organic cotton twill is excellent)
- Pine shavings (the kind used for poultry bedding works well)
- Staple gun and half-inch staples
- Paint for the box and shims
- A small piece (about 1.5” square) of bee-proof screening or metal window screening
- Hammer
- Scissors
- Yard stick
- Push pins
How to construct your quilt box
1) Assemble and paint the box and shims. Unlike bee boxes, a quilt box should be painted on the inside and the outside. Without the protection of interior paint, the moisture passing through the box may migrate into the wood causing the premature failure of the outer paint coating.
2) Cut the fabric piece to about 2 inches larger than the outside dimensions of the box. Mark the midpoint of the length of each edge on the fabric on all sides.
3) Turn the box upside down to install the fabric on the bottom. Mark the edge midpoints on all sides of the box. Arrange the fabric over the box so that it is centered over the box, lining up the center marks on the box and fabric, with the excess fabric evenly divided on each side. Use push pins to temporarily secure the fabric on the box.
4) Remove the pins from one long side and fold the edge of the fabric under; the folded edge will lie about â…› inch from the outer edge of the box. Working outward from the center of the box edge, begin stapling the folded cloth down about every two inches. Stop stapling about 3 inches away from the corner, leaving the corners loose, for now. Repeat this process along the opposite long edge, pulling the folded edge as tightly as you can, then continue on the short sides, smoothing and pulling the fabric so it is as taut as you can make it. Think about a quarter bouncing off the tight fabric.
5) When all four sides are stapled (but with the corners still free), use scissors to cut a diagonal piece off each corner about 1 inch from the point of the corner, which reduces the bulk of the fabric at the corners.
6) Now comes the only tricky part: Making a tidy mitered corner.
- First, fold one edge under; then on the adjoining side make a triangular fold at about a 45-degree angle.
- Then make a second fold to carry the last of the fabric neatly around and under the corner.
- Make the folded corner slightly too small and pull it out a bit to stretch the fabric as tightly as you can.
- Place a diagonal staple over the folded point to hold it. Then, if you are satisfied, finish stapling the edges around the corner, and repeat the process at each corner. You can always pull out the staples and try again if necessary! When you’re satisfied with your corners, finish up by using a hammer to firmly seat each staple.
7) Turn the box right side up again—you should see the raw edges of the fabric. Fill the box with shavings, paying special attention to the corners to make sure they are well-filled. Note: When you go out to the bee yard to install the quilt box, take extra shavings with you.
8) Staple screening (or use push pins) over the inside of the hole in one of the shims. This is the upper shim and you want to prevent bees from entering the hole thinking it will lead them into the hive.
Quick Tip: If you keep chickens, you can recycle your shavings through the chicken coop next summer, then compost afterward!


Installing a quilt box
Once you’ve built your quilt box, it’s time to install it! Follow these five simple steps:

1) Open the hive and remove the inner cover.

2) Set the lower shim down (the one without a screened ventilation hole.) It is set right on top of the upper box.

3) Place the quilt box on top of the shim.

4) Set the upper shim (the one with the screened hole) on top of the quilt box. Check to make sure the filling is evenly packed. Add enough to make a mound in the center.

5) Place the outer cover on top of the upper shim. It's best if you have a piece of 1 or 1.5” XPS insulation tucked up inside the outer cover. This will protect the cover’s underside from the substantial amount of moisture moving through the quilt box over the winter. The inner cover is removed for the winter.

When should quilt boxes be installed?
It’s best to make and install the quilt boxes in the mid-fall so bees have time to seal any gaps with propolis, but don’t worry if you are a little late getting them ready. You can use a strip of foam weatherstripping tape along the top edge of the lower shim, which will conform to any unevenness created by the folded fabric, and make a good seal even if it’s too late for bees to propolize it.

What size should the upper entrance hole be?
If you use a 3/4-inch round hole for your upper entrance, but it seems too large for your winter climate, you can easily reduce it — and even better, make it adjustable by the bees themselves! Follow our easy instructions for how to make an upper entrance wind baffle. All it takes is cardboard, scissors, a door shim, and pushpins!